This feature is already available in our new administration portal. The new portal is currently in beta. Instructions for using the new portal can be found at the end of this article.
In this article, we will show you how to make policies available to your iOS/iPadOS users. Depending on the setup method, there are a variety of different policies available to you.
- If you want to create a new policy for iOS/iPadOS, first proceed as described here.
- Select iOS/iPadOS as the policy you want to add.
- You can use the filter to display the existing policies, depending on the enrollment method. The Reset to defaults button resets all changes you have made to the default settings.
Note! Select the Device Enrollment filter if you are using devices that were embedded via Device Enrollment but are not supervised. For supervised devices that have been embedded via Device Enrollment, use the Supervised Devices filter. For devices embedded via ADE, also select the Supervised Devices filter. User Enrollment is selected when using private iOS/iPadOS devices.
- First enter a name for the policy in the field below as well as an description (upper arrow in illus.).
- Now, select the desired option(s), in the example, the checkbox Allow iTunes Store has been disabled (lower arrow in illus.).
Note! For information on the content of the specific policies, refer to the Apple manual. You can also find information about new policies from iOS/iPadOS 16 here.

- Select the appropriate policy and click on Assign.
- Now select the users, groups or devices to whom you would like to assign the policy.

Note! When assigning directives, be sure to follow the instructions in our Help article Special conditions when assigning multiple policies.
Note! You can also assign the policies under Administration→ Users or Groups.
- The outcome in the example: The apps iTunes Store will be deactivated on the device.

NEW ADMINISTRATION PORTAL: Creating policies for iOS/iPadOS devices
The new administration portal is currently in the beta phase. Please feel free to send us your feedback on the new portal by clicking the corresponding button (located at the bottom left of the new administration portal).
In this article, we will show you how to make policies available to your iOS/iPadOS users. Depending on the setup method, there are a variety of different policies available to you.
- If you want to create a new policy for iOS/iPadOS, first proceed as described here.
- Select iOS/iPadOS as the policy you want to add.
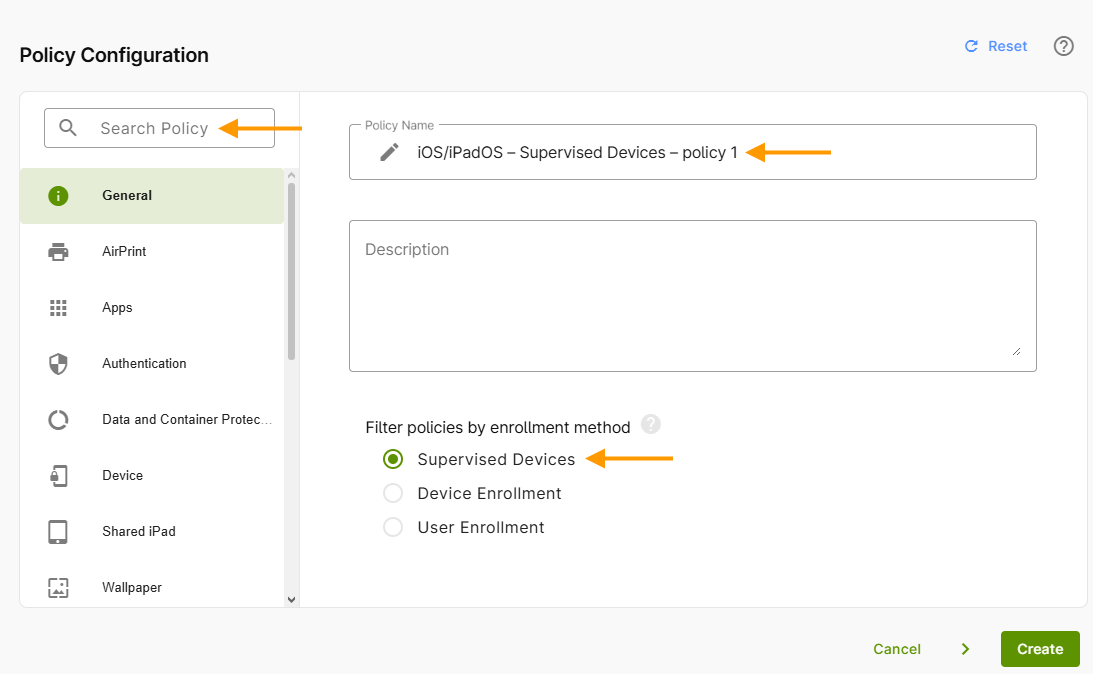
- First enter a name for the policy in the field below as well as an description (upper arrow in illus.).
- You can use the filter to display the existing policies, depending on the enrollment method. The Reset to defaults button resets all changes you have made to the default settings.
Note! Select the Device Enrollment filter if you are using devices that were embedded via Device Enrollment but are not supervised. For supervised devices that have been embedded via Device Enrollment, use the Supervised Devices filter. For devices embedded via ADE, also select the Supervised Devices filter. User Enrollment is selected when using private iOS/iPadOS devices.
- You can find all the policies in the menu on the left side of the page. In the top-left corner, you can search for policy details (left arrow in the image).
- Use the Reset button (top right) to restore all previously made changes to their default settings.
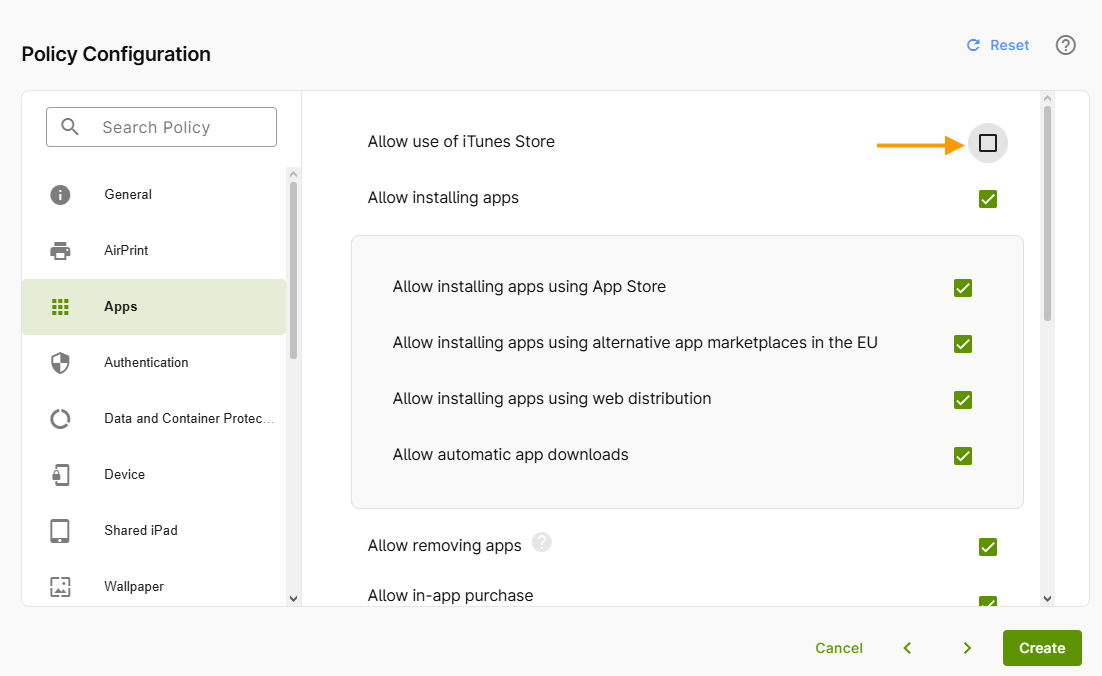
- Now, select the desired option(s), in the example, the checkbox Allow iTunes Store has been disabled (lower arrow in illus.).
- Then click on Create button.
Note! For information on the content of the specific policies, refer to the Apple manual. You can also find information about new policies from iOS/iPadOS 16 here.
The next step is to assign the policy. We'll show you how to do that in our help article, How can I assign/unassign, edit, duplicate and remove policies?
Note! When assigning directives, be sure to follow the instructions in our Help article Special conditions when assigning multiple policies.
- The outcome in the example: The apps iTunes Store will be deactivated on the device.